Computer Version:
The computer interface is a simple C# forms program with buttons for up, down, left, right, and diagonals. I think eventually I will add shapes with custom dimensions features to the program.
using System;
using System.IO;
using System.Windows.Forms;
using System.IO.Ports;
namespace EASproject
{
public class EAS_ControlForm : System.Windows.Forms.Form
{
private Button Up4;
private Button Down3;
private Button Left2;
private Button Right1;
private Button Stop9;
private Button DLD5;
private Button DRD6;
private Button ULD7;
private Button URD8;
public EAS_ControlForm()
{
Text = "EAS Control";
Down3 = new Button ();
Up4 = new Button ();
Left2 = new Button ();
Right1 = new Button ();
Stop9 = new Button ();
DLD5 = new Button ();
DRD6 = new Button ();
ULD7 = new Button ();
URD8 = new Button ();
this.BackColor = System.Drawing.Color.LightBlue;
Down3.Text = "Down";
Down3.Name = "Down3";
Down3.Size = new System.Drawing.Size (72, 30);
Down3.Location = new System.Drawing.Point (105, 65);
Controls.AddRange(new System.Windows.Forms.Control[] {this.Down3});
Down3.Click += new System.EventHandler(OnClickDown3);
Up4.Text = "Up";
Up4.Name = "Up4";
Up4.Size = new System.Drawing.Size (72, 30);
Up4.Location = new System.Drawing.Point (105, 30);
Controls.AddRange(new System.Windows.Forms.Control[] {this.Up4});
Up4.Click += new System.EventHandler(OnClickUp4);
Left2.Text = "Left";
Left2.Name = "Left2";
Left2.Size = new System.Drawing.Size (72, 30);
Left2.Location = new System.Drawing.Point (27, 45);
Controls.AddRange(new System.Windows.Forms.Control[] {this.Left2});
Left2.Click += new System.EventHandler(OnClickLeft2);
Right1.Text = "Right";
Right1.Name = "Right1";
Right1.Size = new System.Drawing.Size (72, 30);
Right1.Location = new System.Drawing.Point (182, 45);
Controls.AddRange(new System.Windows.Forms.Control[] {this.Right1});
Right1.Click += new System.EventHandler(OnClickRight1);
DLD5.Text = "Down.Left diagonal";
DLD5.Name = "DLD5";
DLD5.Size = new System.Drawing.Size (72, 30);
DLD5.Location = new System.Drawing.Point (27, 170);
Controls.AddRange(new System.Windows.Forms.Control[] {this.DLD5});
DLD5.Click += new System.EventHandler(OnClickDLD5);
DRD6.Text = "Down.Right diagonal";
DRD6.Name = "DRD6";
DRD6.Size = new System.Drawing.Size (72, 30);
DRD6.Location = new System.Drawing.Point (182, 170);
Controls.AddRange(new System.Windows.Forms.Control[] {this.DRD6});
DRD6.Click += new System.EventHandler(OnClickDRD6);
ULD7.Text = "Up.Left diagonal";
ULD7.Name = "ULD7";
ULD7.Size = new System.Drawing.Size (72, 30);
ULD7.Location = new System.Drawing.Point (27, 135);
Controls.AddRange(new System.Windows.Forms.Control[] {this.ULD7});
ULD7.Click += new System.EventHandler(OnClickULD7);
URD8.Text = "Up.Right diagonal";
URD8.Name = "URD8";
URD8.Size = new System.Drawing.Size (72, 30);
URD8.Location = new System.Drawing.Point (182, 135);
Controls.AddRange(new System.Windows.Forms.Control[] {this.URD8});
URD8.Click += new System.EventHandler(OnClickURD8);
Stop9.Text = "Stop Motors!";
Stop9.Name = "Stop9";
Stop9.Size = new System.Drawing.Size (72, 30);
Stop9.Location = new System.Drawing.Point (105, 95);
Controls.AddRange(new System.Windows.Forms.Control[] {this.Stop9});
Stop9.Click += new System.EventHandler(OnClickStop9);
}
static SerialPort port;
static public void Main()
{
port = new SerialPort("COM1", 9600, Parity.None, 8, StopBits.One);
port.Open();
Application.Run(new EAS_ControlForm());
}
public static void Example()
{
AppDomain currentDomain = AppDomain.CurrentDomain;
currentDomain.UnhandledException += new UnhandledExceptionEventHandler(MyHandler);
try {
throw new Exception("1");
} catch (Exception e)
{
MessageBox.Show("Catch clause caught : " + e.Message);
}
throw new Exception("2");
}
static void MyHandler(object sender, UnhandledExceptionEventArgs args)
{
Exception e = (Exception) args.ExceptionObject;
Console.WriteLine("MyHandler caught : " + e.Message);
}
static void OnClickDown3 (object sender, System.EventArgs e)
{
port.Write("<9,100>");
port.Write("<3,100>");
}
static void OnClickUp4 (object sender, System.EventArgs e)
{
port.Write("<9,100>");
port.Write("<4,100>");
}
static void OnClickLeft2 (object sender, System.EventArgs e)
{
port.Write("<9,100>");
port.Write("<2,100>");
}
static void OnClickRight1 (object sender, System.EventArgs e)
{
port.Write("<9,100>");
port.Write("<1,100>");
}
static void OnClickDLD5 (object sender, System.EventArgs e)
{
port.Write("<9,100>");
port.Write("<5,100>");
}
static void OnClickDRD6 (object sender, System.EventArgs e)
{
port.Write("<9,100>");
port.Write("<6,100>");
}
static void OnClickULD7 (object sender, System.EventArgs e)
{
port.Write("<9,100>");
port.Write("<7,100>");
}
static void OnClickURD8 (object sender, System.EventArgs e)
{
port.Write("<9,100>");
port.Write("<8,100>");
}
static void OnClickStop9 (object sender, System.EventArgs e)
{
port.Write("<9,100>");
}
}
}
As you can see, i really need to work on the repetition in the code...using System.IO;
using System.Windows.Forms;
using System.IO.Ports;
namespace EASproject
{
public class EAS_ControlForm : System.Windows.Forms.Form
{
private Button Up4;
private Button Down3;
private Button Left2;
private Button Right1;
private Button Stop9;
private Button DLD5;
private Button DRD6;
private Button ULD7;
private Button URD8;
public EAS_ControlForm()
{
Text = "EAS Control";
Down3 = new Button ();
Up4 = new Button ();
Left2 = new Button ();
Right1 = new Button ();
Stop9 = new Button ();
DLD5 = new Button ();
DRD6 = new Button ();
ULD7 = new Button ();
URD8 = new Button ();
this.BackColor = System.Drawing.Color.LightBlue;
Down3.Text = "Down";
Down3.Name = "Down3";
Down3.Size = new System.Drawing.Size (72, 30);
Down3.Location = new System.Drawing.Point (105, 65);
Controls.AddRange(new System.Windows.Forms.Control[] {this.Down3});
Down3.Click += new System.EventHandler(OnClickDown3);
Up4.Text = "Up";
Up4.Name = "Up4";
Up4.Size = new System.Drawing.Size (72, 30);
Up4.Location = new System.Drawing.Point (105, 30);
Controls.AddRange(new System.Windows.Forms.Control[] {this.Up4});
Up4.Click += new System.EventHandler(OnClickUp4);
Left2.Text = "Left";
Left2.Name = "Left2";
Left2.Size = new System.Drawing.Size (72, 30);
Left2.Location = new System.Drawing.Point (27, 45);
Controls.AddRange(new System.Windows.Forms.Control[] {this.Left2});
Left2.Click += new System.EventHandler(OnClickLeft2);
Right1.Text = "Right";
Right1.Name = "Right1";
Right1.Size = new System.Drawing.Size (72, 30);
Right1.Location = new System.Drawing.Point (182, 45);
Controls.AddRange(new System.Windows.Forms.Control[] {this.Right1});
Right1.Click += new System.EventHandler(OnClickRight1);
DLD5.Text = "Down.Left diagonal";
DLD5.Name = "DLD5";
DLD5.Size = new System.Drawing.Size (72, 30);
DLD5.Location = new System.Drawing.Point (27, 170);
Controls.AddRange(new System.Windows.Forms.Control[] {this.DLD5});
DLD5.Click += new System.EventHandler(OnClickDLD5);
DRD6.Text = "Down.Right diagonal";
DRD6.Name = "DRD6";
DRD6.Size = new System.Drawing.Size (72, 30);
DRD6.Location = new System.Drawing.Point (182, 170);
Controls.AddRange(new System.Windows.Forms.Control[] {this.DRD6});
DRD6.Click += new System.EventHandler(OnClickDRD6);
ULD7.Text = "Up.Left diagonal";
ULD7.Name = "ULD7";
ULD7.Size = new System.Drawing.Size (72, 30);
ULD7.Location = new System.Drawing.Point (27, 135);
Controls.AddRange(new System.Windows.Forms.Control[] {this.ULD7});
ULD7.Click += new System.EventHandler(OnClickULD7);
URD8.Text = "Up.Right diagonal";
URD8.Name = "URD8";
URD8.Size = new System.Drawing.Size (72, 30);
URD8.Location = new System.Drawing.Point (182, 135);
Controls.AddRange(new System.Windows.Forms.Control[] {this.URD8});
URD8.Click += new System.EventHandler(OnClickURD8);
Stop9.Text = "Stop Motors!";
Stop9.Name = "Stop9";
Stop9.Size = new System.Drawing.Size (72, 30);
Stop9.Location = new System.Drawing.Point (105, 95);
Controls.AddRange(new System.Windows.Forms.Control[] {this.Stop9});
Stop9.Click += new System.EventHandler(OnClickStop9);
}
static SerialPort port;
static public void Main()
{
port = new SerialPort("COM1", 9600, Parity.None, 8, StopBits.One);
port.Open();
Application.Run(new EAS_ControlForm());
}
public static void Example()
{
AppDomain currentDomain = AppDomain.CurrentDomain;
currentDomain.UnhandledException += new UnhandledExceptionEventHandler(MyHandler);
try {
throw new Exception("1");
} catch (Exception e)
{
MessageBox.Show("Catch clause caught : " + e.Message);
}
throw new Exception("2");
}
static void MyHandler(object sender, UnhandledExceptionEventArgs args)
{
Exception e = (Exception) args.ExceptionObject;
Console.WriteLine("MyHandler caught : " + e.Message);
}
static void OnClickDown3 (object sender, System.EventArgs e)
{
port.Write("<9,100>");
port.Write("<3,100>");
}
static void OnClickUp4 (object sender, System.EventArgs e)
{
port.Write("<9,100>");
port.Write("<4,100>");
}
static void OnClickLeft2 (object sender, System.EventArgs e)
{
port.Write("<9,100>");
port.Write("<2,100>");
}
static void OnClickRight1 (object sender, System.EventArgs e)
{
port.Write("<9,100>");
port.Write("<1,100>");
}
static void OnClickDLD5 (object sender, System.EventArgs e)
{
port.Write("<9,100>");
port.Write("<5,100>");
}
static void OnClickDRD6 (object sender, System.EventArgs e)
{
port.Write("<9,100>");
port.Write("<6,100>");
}
static void OnClickULD7 (object sender, System.EventArgs e)
{
port.Write("<9,100>");
port.Write("<7,100>");
}
static void OnClickURD8 (object sender, System.EventArgs e)
{
port.Write("<9,100>");
port.Write("<8,100>");
}
static void OnClickStop9 (object sender, System.EventArgs e)
{
port.Write("<9,100>");
}
}
}
Arduino Code:
#include
Servo Xaxis;
Servo Yaxis;
int started = 0;
char inData[8];
int ended = 0;
char index = 0;
int final = 0;
void setup()
{
Xaxis.write(90);
Xaxis.attach(6);
Yaxis.write(90);
Yaxis.attach(5);
Serial.begin(9600);
}
void loop()
{
while(Serial.available() > 0)
{
char aChar = Serial.read();
if(aChar == '<') { started = true; index = 0; inData[index] = '\0'; } else if(aChar == '>')
{
ended = true;
}
else if(started)
{
inData[index] = aChar;
index++;
inData[index] = '\0';
}
else if (aChar =='*')
{
final = true;
}
}
if(started && ended)
{
const char* strDelimiter = ",";
char* p;
int time;
int dir;
if ( p = strtok(inData, strDelimiter) )
{
dir = atoi(p);
}
if ( p = strtok(NULL, strDelimiter) )
{
time = atoi(p);
}
// Get ready for the next time
started = false;
ended = false;
index = 0;
inData[index] = '\0';
Move(dir, time);
}
}
//Servos move the dot on etch-a-sketch screen 1in/sec or 31/32
void Move(int dir, int time)
{
if(dir == 1)
{
//Xaxis Right
Xaxis.write(180);
//
}
if(dir == 2)
{
//Xaxis Left
Xaxis.write(0);
}
if(dir == 3)
{
//Yaxis Down
Yaxis.write(0);
}
if(dir == 4)
{
//Yaxis Up
Yaxis.write(180);
}
if(dir == 5)
{
//Down+Left diagonal
Yaxis.write(0);
Xaxis.write(0);
}
if (dir == 6)
{
//Down+Right diagonal
Yaxis.write(0);
Xaxis.write(180);
}
if (dir == 7)
{
//Up+Left diagonal
Yaxis.write(180);
Xaxis.write(0);
}
if (dir == 8)
{
//Up+Right diagonal
Yaxis.write(180);
Xaxis.write(180);
}
if(dir == 9)
{
//stop both motors
Yaxis.write(90);
Xaxis.write(90);
}
}
Basically how this works is: when a button is pressed in the C# program, it stops all previous motor activity by sending "<9,100>" over the serial port to the Arduino. then "<7,100>" is sent which is, in this case, the command for making a 45degree up and left diagonal line on the etch a sketch.Servo Xaxis;
Servo Yaxis;
int started = 0;
char inData[8];
int ended = 0;
char index = 0;
int final = 0;
void setup()
{
Xaxis.write(90);
Xaxis.attach(6);
Yaxis.write(90);
Yaxis.attach(5);
Serial.begin(9600);
}
void loop()
{
while(Serial.available() > 0)
{
char aChar = Serial.read();
if(aChar == '<') { started = true; index = 0; inData[index] = '\0'; } else if(aChar == '>')
{
ended = true;
}
else if(started)
{
inData[index] = aChar;
index++;
inData[index] = '\0';
}
else if (aChar =='*')
{
final = true;
}
}
if(started && ended)
{
const char* strDelimiter = ",";
char* p;
int time;
int dir;
if ( p = strtok(inData, strDelimiter) )
{
dir = atoi(p);
}
if ( p = strtok(NULL, strDelimiter) )
{
time = atoi(p);
}
// Get ready for the next time
started = false;
ended = false;
index = 0;
inData[index] = '\0';
Move(dir, time);
}
}
//Servos move the dot on etch-a-sketch screen 1in/sec or 31/32
void Move(int dir, int time)
{
if(dir == 1)
{
//Xaxis Right
Xaxis.write(180);
//
}
if(dir == 2)
{
//Xaxis Left
Xaxis.write(0);
}
if(dir == 3)
{
//Yaxis Down
Yaxis.write(0);
}
if(dir == 4)
{
//Yaxis Up
Yaxis.write(180);
}
if(dir == 5)
{
//Down+Left diagonal
Yaxis.write(0);
Xaxis.write(0);
}
if (dir == 6)
{
//Down+Right diagonal
Yaxis.write(0);
Xaxis.write(180);
}
if (dir == 7)
{
//Up+Left diagonal
Yaxis.write(180);
Xaxis.write(0);
}
if (dir == 8)
{
//Up+Right diagonal
Yaxis.write(180);
Xaxis.write(180);
}
if(dir == 9)
{
//stop both motors
Yaxis.write(90);
Xaxis.write(90);
}
}
When the Arduino receives the "<7,100>" data, it first checks to make sure it has all of the data by checking for a "<" and a ">" at the beginning and end, respectively, of the line received. then it write the actual data, which is 7,100, to a index. Next, the strtok function reads the index and separates the data by the comma. "7" is written to int dir and "100" to int time. the number in int time isn't important in this version of the code, its only a space holder so i didn't have to rewrite some of the code. Then the line "Move(dir, time)" reads int dir, and turns on the correct motor full speed according to the number in int dir.
int time could be more accurately portrayed as "speed" but that's what i chose at the time of writing the code. In the lines "Yaxis.write(180); Xaxis.write(0);" the values 0 and 180 are full speed in opposite directions. Yaxis is the motor for moving the Etch-A-sketch "utensil" up and down, Xaxis -- left and right. 90 is for stopping the continuous servos(or some call the just motors).
Arduino only version:
#include
Servo Yaxis; // create servo object to control a servo
Servo Xaxis; // a maximum of eight servo objects can be created
int pos = 0;
void setup()
{
Serial.begin(9600);
Xaxis.write(90); //stop both servos
Yaxis.write(90);
Yaxis.attach(5); // attaches the servo on pin 9 to the servo object
Xaxis.attach(6);
Move(1,1950); //Xaxis right
}
void loop()
{
}
void Move(int dir, int time)
{
if (dir == 1)
{
Serial.print("Xaxis Right for ");
Serial.print(time);
Serial.print("ms");
Serial.println();
Xaxis.write(180);
delay(time);
Xaxis.write(90);
}
if (dir == 2)
{
Serial.print("Xaxis Left for ");
Serial.print(time);
Serial.print("ms");
Serial.println();
Xaxis.write(0);
delay(time);
Xaxis.write(90);
}
if (dir == 3)
{
Serial.print("Yaxis Down for ");
Serial.print(time);
Serial.print("ms");
Serial.println();
Yaxis.write(0);
delay(time);
Yaxis.write(90);
}
if (dir == 4)
{
Serial.print("Yaxis Up for ");
Serial.print(time);
Serial.print("ms");
Serial.println();
Yaxis.write(180);
delay(time);
Yaxis.write(90);
}
if (dir == 5)
{
Serial.print("Down+Left diagonal for ");
Serial.print(time);
Serial.print("ms");
Serial.println();
Yaxis.write(0); // tell servo to go to position in variable 'pos'
Xaxis.write(0);
delay(time); // waits 15ms for the servo to reach the position
Xaxis.write(90);
Yaxis.write(90);
}
if (dir == 6)
{
Serial.print("Down+Right diagonal for ");
Serial.print(time);
Serial.print("ms");
Serial.println();
Yaxis.write(0);
Xaxis.write(180);
delay(time);
Yaxis.write(90);
}
if (dir == 7)
{
Serial.print("Up+Left diagonal for ");
Serial.print(time);
Serial.print("ms");
Serial.println();
Yaxis.write(180);
Xaxis.write(0);
delay(time);
Yaxis.write(90);
}
if (dir == 8)
{
Serial.print("Up+Right diagonal for ");
Serial.print(time);
Serial.print("ms");
Serial.println();
Yaxis.write(180);
Xaxis.write(180);
delay(time);
Yaxis.write(90);
}
}
This version doesn't require a computer for moving the servos, instead the motors are told what to do in the actual code. (But i do have Serial.Print to debug the code, and make sure the code is working correctly.) This can be seen in "void setup()" with the "Move(1,1950);" line. Now, the Arduino does not only control which motor turns, but also how long. In the line above, "1,1950" is moving the Etch-a-Sketch "cursor" right along the X-Axis for 1950ms which is 1.95seconds once per time the Arduino code is ran.Servo Yaxis; // create servo object to control a servo
Servo Xaxis; // a maximum of eight servo objects can be created
int pos = 0;
void setup()
{
Serial.begin(9600);
Xaxis.write(90); //stop both servos
Yaxis.write(90);
Yaxis.attach(5); // attaches the servo on pin 9 to the servo object
Xaxis.attach(6);
Move(1,1950); //Xaxis right
}
void loop()
{
}
void Move(int dir, int time)
{
if (dir == 1)
{
Serial.print("Xaxis Right for ");
Serial.print(time);
Serial.print("ms");
Serial.println();
Xaxis.write(180);
delay(time);
Xaxis.write(90);
}
if (dir == 2)
{
Serial.print("Xaxis Left for ");
Serial.print(time);
Serial.print("ms");
Serial.println();
Xaxis.write(0);
delay(time);
Xaxis.write(90);
}
if (dir == 3)
{
Serial.print("Yaxis Down for ");
Serial.print(time);
Serial.print("ms");
Serial.println();
Yaxis.write(0);
delay(time);
Yaxis.write(90);
}
if (dir == 4)
{
Serial.print("Yaxis Up for ");
Serial.print(time);
Serial.print("ms");
Serial.println();
Yaxis.write(180);
delay(time);
Yaxis.write(90);
}
if (dir == 5)
{
Serial.print("Down+Left diagonal for ");
Serial.print(time);
Serial.print("ms");
Serial.println();
Yaxis.write(0); // tell servo to go to position in variable 'pos'
Xaxis.write(0);
delay(time); // waits 15ms for the servo to reach the position
Xaxis.write(90);
Yaxis.write(90);
}
if (dir == 6)
{
Serial.print("Down+Right diagonal for ");
Serial.print(time);
Serial.print("ms");
Serial.println();
Yaxis.write(0);
Xaxis.write(180);
delay(time);
Yaxis.write(90);
}
if (dir == 7)
{
Serial.print("Up+Left diagonal for ");
Serial.print(time);
Serial.print("ms");
Serial.println();
Yaxis.write(180);
Xaxis.write(0);
delay(time);
Yaxis.write(90);
}
if (dir == 8)
{
Serial.print("Up+Right diagonal for ");
Serial.print(time);
Serial.print("ms");
Serial.println();
Yaxis.write(180);
Xaxis.write(180);
delay(time);
Yaxis.write(90);
}
}
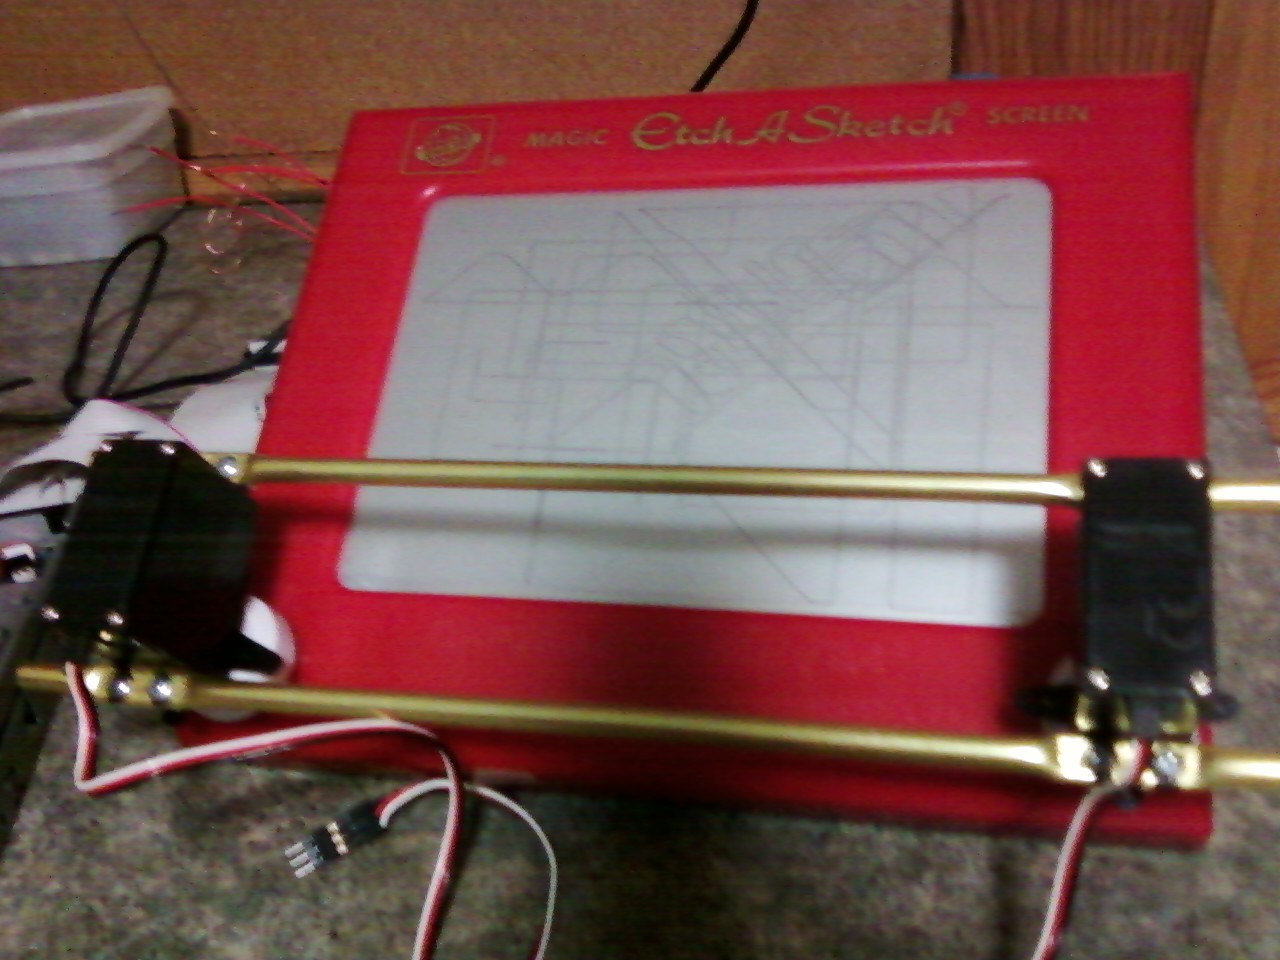
Pics: I used the same breadboard Arduino for the RGB LEDs and the Etch-A-Sketch.

No comments:
Post a Comment